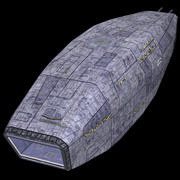
Gemini
Imperial vessel. Part of the Zodiac Battle Fleet.
History
Stationed at the Synastry facility while waiting for the rest of the Zodiac Battle Fleet to arrive at the rendezvous point. Present during an undercover Republic Shield reconnaissance operation led by the captured Victory Star Destroyer Kingpin. The Kingpin used its battle damage to fool Imperial forces into preparing a repair operation while a reconnaissance force roamed the area collecting data of the assembled craft. The reconnaissance operation was revealed when the Calamari Cruiser Sagittarius arrived and alerted Imperial forces to the true allegiance of the Kingpin. The Victory Star Destroyer then attempted to withdraw from the outpost while Imperial forces attempted to bring it down. They failed, as the Kingpin and its reconnaissance force escaped into hyperspace. (RgF402)
Delivered Imperial forces to contest Republic Shield occupation of the abandoned pirate platform Kodiak. Further remained in the combat zone to directly lead Imperial forces in the assault. Forced to withdraw from the engagement zone when New Republic reinforcements led by the Strike Cruiser Sulu directly engaged the vessel, causing its shields to collapse. (RgF403)
Collided with an asteroid in the Zeta Gamma belt, which damaged the vessel’s systems, including hyperdrive. Awaited repair crews, a replacement hyperdrive and replacement starfighters near the communications satellite ST302, which relayed the information to Republic Shield and New Republic forces. The vessel was protected by only light defences, and was not expecting the attack that followed. Republic Shield forces bombarded the vessel, disabling it and the savaging the resupply convoy. The cargo ferries Jeffries I and Jeffries II were shot down after delivering replacements TIE starfighters to the combat zone. The freighters Triton I and Triton II attempted to deliver a replacement hyperdrive and a repair crews to the vessel, but they were disabled by Republic Shield forces. New Republic reinforcements soon arrived, wiping out any Imperial resistance, and vessel was soon disabled. The Calamari Cruiser Valiant entered the combat zone and deployed boarding craft, which captured the various resupply craft and several disabled Imperial starfighters. The vessel was stormed by commandos from shuttle group VAL4049 which entered via the hangar, and was captured and repaired by a boarding crew from the transport VAL3393. The vessel was soon captured by New Republic forces, which activated the backup hyperdrive and pushed the vessel from the combat zone to a nearby area of space to effect repairs. The repair freighters, which had also been captured by New Republic forces, also travelled to the nearby repair zone, escorted by the Calamari Cruiser Valiant. (RgF406)
The vessel’s databanks yielded the location of the captured Victory Star Destroyer Overseer, and the vessel was repaired and prepared to mount a rescue operation. Led undercover Republic Shield reclamation operation of the Victory Star Destroyer Overseer, which was stationed between the Dreadnaught Cancer and the Frigate Pisces in an Imperial staging area, while awaiting the arrival of an Imperial prison ship to take away the Overseer’s crew. Escorted the Freighters Triton I and Triton II into the meeting area. The freighters played the part of Imperial prison ships however they were in truth loaded with explosives. Republic Shield undercover forces escorted the freighters in until the trap was sprung. The transport Servo, carrying a repair crew, launched from the freighter Triton II while the freighters rammed the Imperial command ships. The Triton I’s collision completely destroyed the Frigate Pisces, while the Triton II detonated on the Dreadnaught Cancer’s shields, greatly weakening the Imperial command ship. The vessel co-ordinated Republic Shield forces in the defence of the transport Servo while the repair crew secured the Overseer, overpowering the Imperial guards, and repairing the Victory Star Destroyer. Imperial forces concentrated an attack upon the vessel, but Republic Shield forces defended the vessel while the Overseer was liberated. The recapture of the Overseer was a major turning point in the operation, as the Victory Star Destroyer turned its weapons onto the Dreadnaught Cancer, incinerating the shield-damaged command ship. Imperial forces were then forced to divide their attention between assailing Republic Shield defensive forces, the escaping Overseer, and the vessel. The Victor Star Destroyer Overseer was hammered by Imperial forces unwilling to concede the ship, however it limped from the area and successfully escaped into hyperspace. Imperial forces were reinforced by the arrival of the real prison ship, the corvette Gutwrench, which rallied Imperial forces against the vessel as it attempted to withdraw from the combat zone, as the reclamation objective had been achieved. Republic Shield forces struck back, destroying the corvette and mopping up the Imperial forces, allowing the vessel to depart from the area. (RgF407)
The vessel was used as bait for an ambush against Imperial forces. To this end the vessel was abandoned and surrounded by a minefield, while signalling a wide-band distress call. The Interdictor Chains of Justice waited a fair distance from the vessel, to engage its interdiction field and prevent any Imperial attack force from withdrawing after the trap was sprung by Republic Shield forces waiting nearby. Imperial forces attempted to take control of the combat zone in an effort to reclaim the vessel; however Republic Shield forces hammered the Imperial attack force, especially the Dreadnaught Aries and Frigate Virgo. Republic Shield forces crushed the attacking forces, routing the Imperial forces, and destroying the Aries and the Virgo. However, the victory was short-lived, as Imperial reinforcements soon arrived, the Calamari Cruiser Sagittarius driving off the Interdictor Chains of Justice, and the Victory Star Destroyer Leo scattering Republic Shield forces, and bombarding the vessel to its fiery end. Destroyed by Imperial forces. (RgF408)
